Tabla de contenido
Hello! Today we continue with the Docker theme. We will talk about how to integrate Docker with Python, that is, how to use Docker from Python by calling the Docker API.
Let’s get started!

As you already know from other articles we have written ( such as https://aprendeit.com/en/how-to-get-started-with-docker/) Docker is a container-based virtualization system. It is very powerful and versatile. And today we show you how to use its API from Python to integrate it into your developments and scripts. Even to be able to make your own orchestrator (although for this you may be more interested in kubernetes, but we will talk about this).
From the docker API for python you can perform a wide variety of operations. You can create containers, manage existing ones, manage images, and so on.
Let’s go by parts:
1. Installing Docker API package
We assume that we already have docker installed in the system (if this is not the case, we can see how to do it in this article https://aprendeit.com/en/how-to-get-started-with-docker/ ). So the next step is to install the docker API package with pip.
To start we must install pip if we don’t have it installed.
In Centos 7:
# yum install epel-release
# yum -y install python-pip
In Debian:
# apt-get instal python-pip
Once pip is installed, we install the python module “docker”:
root@host :~# pip install docker
Collecting docker
  Downloading https://files.pythonhosted.org/packages/e1/58/938fbc7acd98302ca4872f5eab8ab811498e342ab5aec0c1609f22e0aeda/docker-3.6.0-py2.py3-none-any.whl (131kB)
    100% |████████████████████████████████| 133kB 989kB/s
Requirement already satisfied: backports.ssl-match-hostname>=3.5; python_version < "3.5" in /usr/local/lib/python2.7/dist-packages (from docker) (3.5.0.1) Requirement already satisfied: docker-pycreds>=0.3.0 in /usr/local/lib/python2.7/dist-packages (from docker) (0.4.0)
Requirement already satisfied: ipaddress>=1.0.16; python_version < "3.3" in /usr/lib/python2.7/dist-packages (from docker) (1.0.17) Requirement already satisfied: requests!=2.18.0,>=2.14.2 in /usr/local/lib/python2.7/dist-packages (from docker) (2.19.1)
Requirement already satisfied: six>=1.4.0 in /usr/lib/python2.7/dist-packages (from docker) (1.11.0)
Requirement already satisfied: websocket-client>=0.32.0 in /usr/local/lib/python2.7/dist-packages (from docker) (0.54.0)
Requirement already satisfied: idna<2.8,>=2.5 in /usr/lib/python2.7/dist-packages (from requests!=2.18.0,>=2.14.2->docker) (2.6)
Requirement already satisfied: certifi>=2017.4.17 in /usr/local/lib/python2.7/dist-packages (from requests!=2.18.0,>=2.14.2->docker) (2018.8.24)
Requirement already satisfied: chardet<3.1.0,>=3.0.2 in /usr/local/lib/python2.7/dist-packages (from requests!=2.18.0,>=2.14.2->docker) (3.0.4)
Requirement already satisfied: urllib3<1.24,>=1.21.1 in /usr/local/lib/python2.7/dist-packages (from requests!=2.18.0,>=2.14.2->docker) (1.23)
Installing collected packages: docker
Successfully installed docker-3.6.0
Now that we have installed the python module to work with docker we can start:
2. Where do we start
Everything we are going to do now can be done from the python console or from a script, in this case we will orient it to a script.
1. Declare the docker being used
First of all we must declare which docker we are going to use, this can be done in several ways:
import docker

client = docker.DockerClient(base_url='unix://var/run/docker.sock')
Another way to declare it is:
import docker

client = docker.from_env()
2. Create container and start them
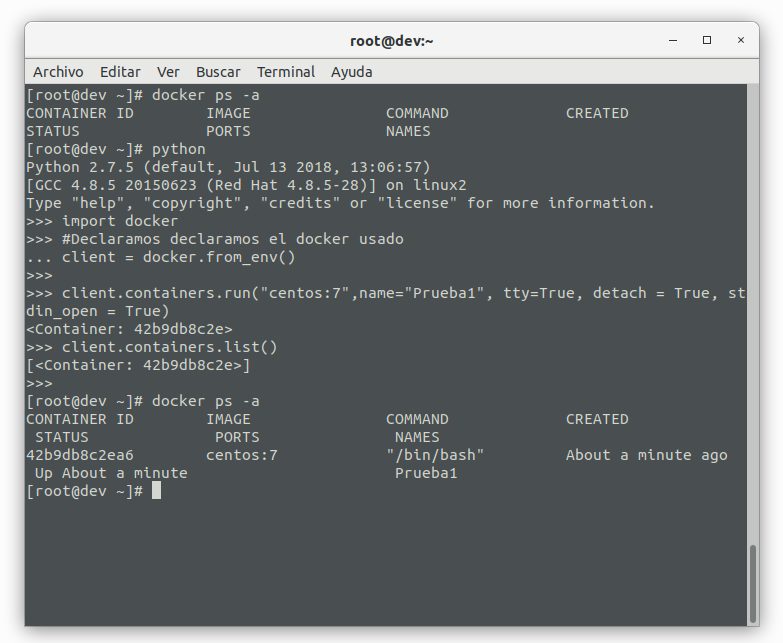
To create containers and for all the other operations that we will show we must always declare first the docker used. Then we will call the run method, the parameters are: run(IMAGE,name=”NAME OF CONTAINER”, tty=True,detach=True, stdin_open=True ). If the image is not downloaded it will take a little longer, later we will see how to list the available images.
import docker
#Declaramos declaramos el docker usado
client = docker.from_env()

client.containers.run("centos:7",name="Prueba1", tty=True, detach = True, stdin_open = True)
3. List containers
When we request the list it will return an array with the IDs of the generated containers. When doing it with containers.list() is the same as if we did docker ps, it only shows us the raised ones, to see all, it is necessary to execute it with the parameter all=True, that is to say client.containers.list(all=True).
import docker
#Declaramos declaramos el docker usado
client = docker.from_env()

lista = []
lista = client.containers.run("centos:7",name="Prueba1", tty=True, detach = True, stdin_open = True)
#Nos devolverá un array de objetos container como: [,]
Here is an example:
4. Starting and stopping containers
From a list of containers, we can work on them, switching them off, deleting them and starting them.
import docker
#Declaramos declaramos el docker usado
client = docker.from_env()

lista = []
lista = client.containers.list(all=True)
for contenedor in lista:
    print("su id es {0} y su nombre {1} ".format(contenedor.id,contenedor.name))
    print(contenedor.status)
    contenedor.stop()

lista = client.containers.list(all=True)
for contenedor in lista:
    print(contenedor.status)
    contenedor.start()

lista = client.containers.list(all=True)
for contenedor in lista:
    print(contenedor.status)
    contenedor.status()
In the previous code we make several loops to update the state, the result would be:
[root@dev ~]# python
Python 2.7.5 (default, Jul 13 2018, 13:06:57)
[GCC 4.8.5 20150623 (Red Hat 4.8.5-28)] on linux2
Type "help", "copyright", "credits" or "license" for more information.
>>> import docker
>>> #Declaramos declaramos el docker usado
... client = docker.from_env()
>>>
>>> lista = []
>>> lista = client.containers.list(all=True)
>>> for contenedor in lista:
...     print("su id es {0} y su nombre {1} ".format(contenedor.id,contenedor.name))
...     print(contenedor.status)
...     contenedor.stop()
...
su id es 0f5278995d793e6627ec1086094a38052e83089ee43fa150ed8e1fb55c6d6c0a y su nombre Prueba1
running
>>> lista = client.containers.list(all=True)
>>> for contenedor in lista:
...     print(contenedor.status)
...     contenedor.start()
...
exited
>>> lista = client.containers.list(all=True)
>>> for contenedor in lista:
...     print(contenedor.status)
...     contenedor.status()
...
running
To delete a container, it must first be stopped and we can do it as we do with “.stop()” but we put in place “.remove()“.
5. List images
To view the images it is quite similar to how we do it with the containers, we call the method “.list()” of images:
import docker
#Declaramos declaramos el docker usado
client = docker.from_env()

lista = []
lista = client.images.list()
for image in lista:
   print(image.id)
   print(image.tags)
#Nos devolverá un array de objetos image con los datos de las imagenes locales
For example:
[root@dev ~]# python
Python 2.7.5 (default, Jul 13 2018, 13:06:57)
[GCC 4.8.5 20150623 (Red Hat 4.8.5-28)] on linux2
Type "help", "copyright", "credits" or "license" for more information.
>>> import docker
>>> #Declaramos declaramos el docker usado
... client = docker.from_env()
>>>
>>> lista = []
>>> lista = client.images.list()
>>> for image in lista:
...    print(image.id)
...    print(image.tags)
... #Nos devolverá un array de objetos image
...
sha256:1e1148e4cc2c148c6890a18e3b2d2dde41a6745ceb4e5fe94a923d811bf82ddb
[u'docker.io/centos:7']
sha256:dc496f71dbb587a32a007a0ffb420d1b35c55ec31cda99c0f5336954623f8368
[u'docker.io/alpine:3.5']
sha256:174b26fe09c724368aa2c3cc8f2b979b915a33f7b50c94cd215380d56147cd60
[u'docker.io/alpine:3.4']
sha256:c78b5648029c3636a0c6d056eeba8c3a2e970976342ee156155db19ca81c6f5e
[u'docker.io/alpine:3.3']
sha256:4558d96d24b5acf7d9bdaa060124ae787fa38093eb00538b88378833de5a223d
[u'docker.io/alpine:3.2']
sha256:f36c4228b2c6863208de3a13f2e467476d00ab492416c0aadcfc0e247db1ee03
[u'docker.io/alpine:3.1']
sha256:de4761d9f0371cbace6a4c2ebef14b14ce30185a7fcedb5e04b170130e7e642d
[u'docker.io/alpine:edge']
sha256:196d12cf6ab19273823e700516e98eb1910b03b17840f9d5509f03858484d321
[u'docker.io/alpine:3.8', u'docker.io/alpine:latest']
sha256:34ea7509dcad10aa92310f2b41e3afbabed0811ee3a902d6d49cb90f075fe444
[u'docker.io/alpine:3.7']
sha256:94627dfbdf19f1344aae6ef72db6ff30c5148b60e1091de098807ec4b42febbc
[u'docker.io/alpine:3.6']
sha256:b1666055931f332541bda7c425e624764de96c85177a61a0b49238a42b80b7f9
[u'docker.io/bfirsh/reticulate-splines:latest']
sha256:93f518ec2c41722d6c21e55f96cef4dc4c9ba521cab51a757b1d7272b393902f
[u'docker.io/alpine:2.7']
sha256:e738dfbe7a10356ea998e8acc7493c0bfae5ed919ad7eb99550ab60d7f47e214
[u'docker.io/alpine:2.6']
If you are interested in learning Docker you can purchase our book here.
 Docker para novatos
 Docker para novatos
And this is just a small part of what can be done, you can find all the information about the bookstore at https://docker-py.readthedocs.io/en/stable/client.html since it is the official website.
And that’s all for today, I hope you liked it.
If you liked it, please leave a comment and/or share the article in your social networks.
See you soon!