Tabla de contenido
Instalando MySQL
A continuación veremos cómo instalar MySQL en varias distribuciones Linux. Veremos cómo hacerlo en las principales distribuciones (Basadas en RedHat, Debian y Ubuntu).
Instalando MySQL en RedHat / CentOS (Linux)
Todos los comandos que ejecutaremos a continuación deben ejecutarse con el usuario root o bien si no se hace con este usuario ejecutarlos con sudo delante del comando.
Lo primero que debemos hacer para instalar MySQL Community en CentOS / RedHat / Fedora.
Dependiendo de la versión de CentOS que tengamos instalada debemos descargarnos un repositorio u otro.
Para elegir repositorio nos vamos a https://dev.mysql.com/downloads/repo/yum/ y elegimos el que más se adapta a nuestro sistema, por ejemplo, para CentOS y RedHat 7 elegimos “Red Hat Enterprise Linux 7 / Oracle Linux 7” mientras que para CentOS y RedHat 8 elegimos “Red Hat Enterprise Linux 8 / Oracle Linux 8”.
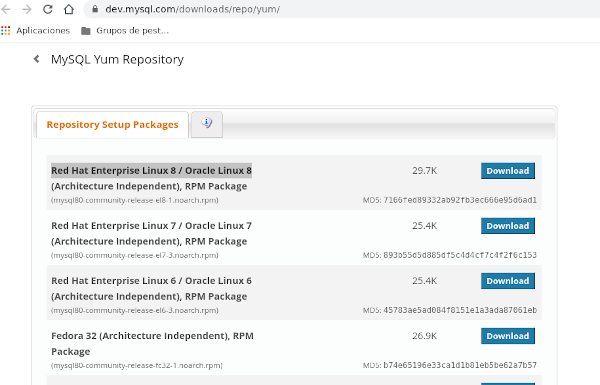
Una vez localizado el repositorio en la web tenemos que copiar la URL para descargarlo:

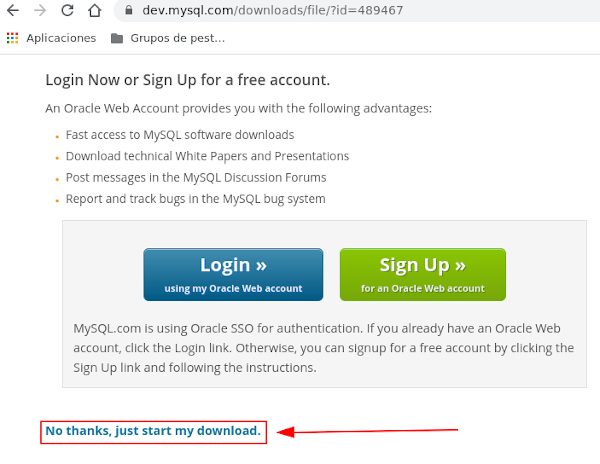
Si pinchamos encima del botón “Download” nos iremos a la página de descarga. En esta página de descarga podemos pinchar con el botón derecho del ratón en “No thanks, just start my download” y copiar el enlace.
Nosotros vamos a instalarlo sobre CentOS 8, pero la instalación es igual solo cambia la elección del repositorio.
Ya teniendo la URL del repositorio (En nuestro caso https://dev.mysql.com/get/mysql80-community-release-el8-1.noarch.rpm ) ya podemos ir a la Shell del sistema donde vamos a instalar MySQL y ejecutar lo siguiente:
yum install URL_DEL_REPOSITORIO
En nuestro caso:
[root@mysqlhost ~]# yum install https://dev.mysql.com/get/mysql80-community-release-el8-1.noarch.rpm
Failed to set locale, defaulting to C.UTF-8
Last metadata expiration check: 0:00:44 ago on Wed Jun 17 05:55:52 2020.
mysql80-community-release-el8-1.noarch.rpm 23 kB/s | 30 kB 00:01
Dependencies resolved.
======================================================================================================================================================
Package Architecture Version Repository Size
======================================================================================================================================================
Installing:
mysql80-community-release noarch el8-1 @commandline 30 kTransaction Summary
======================================================================================================================================================
Install 1 PackageTotal size: 30 k
Installed size: 29 k
Is this ok [y/N]: y
Downloading Packages:
Running transaction check
Transaction check succeeded.
Running transaction test
Transaction test succeeded.
Running transaction
Preparing : 1/1
Installing : mysql80-community-release-el8-1.noarch 1/1
Verifying : mysql80-community-release-el8-1.noarch 1/1Installed:
mysql80-community-release-el8-1.noarch

Complete!
[root@mysqlhost ~]#
Como ya tenemos instalado el repositorio instalado ya podemos ejecutar:
yum install mysql-server
Nos pedirá confirmación, si no nos pide reemplazo de ningún software que necesitemos, confirmamos introduciendo “y”.
Si todo ha ido bien, tras completar el paso anterior si ejecutamos los siguientes comandos deberíamos ver el servicio corriendo:
systemctl start mysqld
systemctl enable mysqld
systemctl status mysqld
La salida debería ser similar a esta:
[root@mysqlhost ~]# systemctl start mysqld
[root@mysqlhost ~]# systemctl status mysqld
● mysqld.service - MySQL 8.0 database server
   Loaded: loaded (/usr/lib/systemd/system/mysqld.service; disabled; vendor preset: disabled)
   Active: active (running) since Wed 2020-06-17 06:22:04 UTC; 7s ago
  Process: 480 ExecStartPost=/usr/libexec/mysql-check-upgrade (code=exited, status=0/SUCCESS)
  Process: 340 ExecStartPre=/usr/libexec/mysql-prepare-db-dir mysqld.service (code=exited, status=0/SUCCESS)
  Process: 304 ExecStartPre=/usr/libexec/mysql-check-socket (code=exited, status=0/SUCCESS)
 Main PID: 434 (mysqld)
   Status: "Server is operational"
    Tasks: 39 (limit: 75410)
   Memory: 479.7M
   CGroup: /system.slice/containerd.service/system.slice/mysqld.service
           └─434 /usr/libexec/mysqld --basedir=/usr

Jun 17 06:21:59 mysqlhost systemd[1]: Starting MySQL 8.0 database server...
Jun 17 06:21:59 mysqlhost mysql-prepare-db-dir[340]: Initializing MySQL database
Jun 17 06:22:04 mysqlhost systemd[1]: Started MySQL 8.0 database server.
[root@mysqlhost ~]#
Como se puede ver en la siguiente salida ya está instalado y funcionando MySQL:
[root@mysqlhost ~]# mysql
Welcome to the MySQL monitor.  Commands end with ; or \g.
Your MySQL connection id is 9
Server version: 8.0.17 Source distribution

Copyright (c) 2000, 2019, Oracle and/or its affiliates. All rights reserved.

Oracle is a registered trademark of Oracle Corporation and/or its
affiliates. Other names may be trademarks of their respective
owners.

Type 'help;' or '\h' for help. Type '\c' to clear the current input statement.

mysql> SELECT version();
+-----------+
| version() |
+-----------+
| 8.0.17    |
+-----------+
1 row in set (0.00 sec)
mysql>
Instalando MySQL en Ubuntu / Debian (Linux)
La instalación para Debian y todas las distribuciones basadas en Debian, como Ubuntu es similar.
Recuerda que todos los comandos que ponemos a continuación deben ser ejecutados desde el usuario root o en su defecto con sudo delante del comando.
Al igual que en RedHat y CentOS, en Debian y derivados debemos instalar el repositorio, para ello, primero debemos ejecutar algunos pasos previos.
El primer paso es actualizar los repositorios e instalar curl para ello ejecutamos:
apt-get update && apt-get install –y wget
Después, entramos en https://dev.mysql.com/downloads/repo/apt/ y pinchamos en el botón “Download” del repositorio a instalar y copiamos el enlace del repositorio tal y como vimos en la instalación de MySQL en RedHat/CentOS.
En mi caso la URL del repositorio que voy a instalar es https://dev.mysql.com/get/mysql-apt-config_0.8.15-1_all.deb
Para instalar el repo ejecutamos el siguiente comando (sustituyendo URL-DEL-REPO por la URL que hemos obtenido):
wget -O /root/mysql-repo.deb URL-DEL-REPO
apt-get install /root/mysql-repo.deb -y
En mi caso:
wget -O mysql-repo.deb https://dev.mysql.com/get/mysql-apt-config_0.8.15-1_all.deb
apt-get install /root/mysql-repo.deb -y
Al ejecutar el instalador del repositorio te preguntará cuál es tu distribución y debes contestarle con nuestro sistema:
The detected system () is not supported by MySQL. If you believe the platform is compatible with one of the supported systems, one of the
corresponding repositories may be selected.

  1. debian jessie  2. debian stretch  3. debian buster  4. ubuntu xenial  5. ubuntu bionic  6. ubuntu focal  7. ubuntu eoan abort
Add repository to unsupported system? 5

Después nos preguntara que productos MySQL queremos configurar, le damos la opción 4:

Once you are satisfied with the configuration then select last option 'Ok' to save the configuration, then run 'apt-get update' to load package list.
Advanced users can always change the configurations later, depending on their own needs.

  1. MySQL Server & Cluster (Currently selected: mysql-8.0)  3. MySQL Preview Packages (Currently selected: Disabled)
  2. MySQL Tools & Connectors (Currently selected: Enabled)  4. Ok
Which MySQL product do you wish to configure? 4
Una vez hecha instalación ejecutamos de nuevo la actualización de repositorios:
root@mysqlhost2:~# apt-get update
Get:1 http://repo.mysql.com/apt/ubuntu bionic InRelease [19.4 kB]
Hit:2 http://archive.ubuntu.com/ubuntu bionic InRelease
Hit:3 http://archive.ubuntu.com/ubuntu bionic-updates InRelease
Hit:4 http://archive.ubuntu.com/ubuntu bionic-backports InRelease
Hit:5 http://security.ubuntu.com/ubuntu bionic-security InRelease
Get:6 http://repo.mysql.com/apt/ubuntu bionic/mysql-8.0 Sources [946 B]
Get:7 http://repo.mysql.com/apt/ubuntu bionic/mysql-8.0 amd64 Packages [7605 B]
Get:8 http://repo.mysql.com/apt/ubuntu bionic/mysql-tools amd64 Packages [5331 B]
Get:9 http://repo.mysql.com/apt/ubuntu bionic/mysql-apt-config amd64 Packages [563 B]
Fetched 33.8 kB in 1s (43.9 kB/s)
Reading package lists... Done
root@mysqlhost2:~#
Y ahora ya podemos instalar mysql-server con el siguiente comando:
apt-get install mysql-server
A diferencia de lo que pasa en la instalación de MySQL RedHat y derivados, en la de Debian y derivados pide establecer la password de root. Si es una instalación “silenciosa” no lo pedirá.
root@mysqlhost2:~# apt-get install mysql-server
Reading package lists... Done
Building dependency tree
Reading state information... Done
The following additional packages will be installed:
  libaio1 libmecab2 libnuma1 mecab-ipadic mecab-ipadic-utf8 mecab-utils mysql-client mysql-common mysql-community-client mysql-community-client-core
  mysql-community-server mysql-community-server-core
The following NEW packages will be installed:
  libaio1 libmecab2 libnuma1 mecab-ipadic mecab-ipadic-utf8 mecab-utils mysql-client mysql-community-client mysql-community-client-core
  mysql-community-server mysql-community-server-core mysql-server
The following packages will be upgraded:
  mysql-common
1 upgraded, 12 newly installed, 0 to remove and 22 not upgraded.
Need to get 35.7 MB of archives.
After this operation, 250 MB of additional disk space will be used.
Do you want to continue? [Y/n]
Get:1 http://archive.ubuntu.com/ubuntu bionic-updates/main amd64 libaio1 amd64 0.3.110-5ubuntu0.1 [6476 B]
Get:2 http://repo.mysql.com/apt/ubuntu bionic/mysql-8.0 amd64 mysql-common amd64 8.0.20-1ubuntu18.04 [94.3 kB]
Get:3 http://archive.ubuntu.com/ubuntu bionic/universe amd64 libmecab2 amd64 0.996-5 [257 kB]
Get:4 http://repo.mysql.com/apt/ubuntu bionic/mysql-8.0 amd64 mysql-community-client-core amd64 8.0.20-1ubuntu18.04 [1707 kB]
Get:5 http://archive.ubuntu.com/ubuntu bionic-updates/main amd64 libnuma1 amd64 2.0.11-2.1ubuntu0.1 [22.0 kB]
Get:6 http://archive.ubuntu.com/ubuntu bionic/universe amd64 mecab-utils amd64 0.996-5 [4856 B]
Get:7 http://archive.ubuntu.com/ubuntu bionic/universe amd64 mecab-ipadic all 2.7.0-20070801+main-1 [12.1 MB]
Get:8 http://repo.mysql.com/apt/ubuntu bionic/mysql-8.0 amd64 mysql-community-client amd64 8.0.20-1ubuntu18.04 [2834 kB]
Get:9 http://archive.ubuntu.com/ubuntu bionic/universe amd64 mecab-ipadic-utf8 all 2.7.0-20070801+main-1 [3522 B]
Get:10 http://repo.mysql.com/apt/ubuntu bionic/mysql-8.0 amd64 mysql-client amd64 8.0.20-1ubuntu18.04 [90.7 kB]
Get:11 http://repo.mysql.com/apt/ubuntu bionic/mysql-8.0 amd64 mysql-community-server-core amd64 8.0.20-1ubuntu18.04 [18.4 MB]
Get:12 http://repo.mysql.com/apt/ubuntu bionic/mysql-8.0 amd64 mysql-community-server amd64 8.0.20-1ubuntu18.04 [102 kB]
Get:13 http://repo.mysql.com/apt/ubuntu bionic/mysql-8.0 amd64 mysql-server amd64 8.0.20-1ubuntu18.04 [90.7 kB]
Fetched 35.7 MB in 19s (1882 kB/s)
debconf: unable to initialize frontend: Dialog
debconf: (No usable dialog-like program is installed, so the dialog based frontend cannot be used. at /usr/share/perl5/Debconf/FrontEnd/Dialog.pm line 76, <> line 13.)
debconf: falling back to frontend: Readline
Preconfiguring packages ...
Configuring mysql-community-server
----------------------------------

Please provide a strong password that will be set for the root account of your MySQL database. Leave it blank to enable password less login using
UNIX socket based authentication.

Enter root password:
En cualquier caso, si la dejamos en blanco, luego podemos configurarla.
En Debian y derivados también preguntara en la instalación por defecto por la configuración de cifrado passwords:
MySQL 8 uses a new authentication based on improved SHA256-based password methods. It is recommended that all new MySQL Server installations use this
method going forward. This new authentication plugin requires new versions of connectors and clients, with support for this new authentication method
(caching_sha2_password). Currently MySQL 8 Connectors and community drivers built with libmysqlclient21 support this new method. Clients built with
older versions of libmysqlclient may not be able to connect to the new server.

To retain compatibility with older client software, the default authentication plugin can be set to the legacy value (mysql_native_password) This
should only be done if required third-party software has not been updated to work with the new authentication method. The change will be written to
the file /etc/mysql/mysql.conf.d/default-auth-override.cnf

After installation, the default can be changed by setting the default_authentication_plugin server setting.

  1. Use Strong Password Encryption (RECOMMENDED)  2. Use Legacy Authentication Method (Retain MySQL 5.x Compatibility)
Select default authentication plugin 1
Lo mejor es seleccionar la opción recomendada, como se hace en el ejemplo.
Una vez seguidos estos pasos, si todo ha salido bien ya tenemos MySQL en nuestro sistema, solo falta levantar el servicio, en Debian y derivados se llama de forma distinta, por lo que hay que ejecutar:
systemctl start mysql
systemctl enable mysql
systemctl status mysql
Como se puede ver en el ejemplo:
root@mysqlhost2:~# systemctl start mysql
root@mysqlhost2:~# systemctl enable mysql
root@mysqlhost2:~# systemctl status mysql
● mysql.service - MySQL Community Server
   Loaded: loaded (/lib/systemd/system/mysql.service; enabled; vendor preset: enabled)
   Active: active (running) since Wed 2020-06-17 11:50:28 CEST; 8s ago
     Docs: man:mysqld(8)
           http://dev.mysql.com/doc/refman/en/using-systemd.html
 Main PID: 2380 (mysqld)
   Status: "Server is operational"
    Tasks: 39 (limit: 14139)
   CGroup: /system.slice/containerd.service/system.slice/mysql.service
           └─2380 /usr/sbin/mysqld

Jun 17 11:50:28 mysqlhost2 systemd[1]: Starting MySQL Community Server...
Jun 17 11:50:28 mysqlhost2 mysql-systemd-start[2344]: /usr/share/mysql-8.0/mysql-systemd-start: line 39: /lib/apparmor/profile-load: No such file or d
Jun 17 11:50:28 mysqlhost2 systemd[1]: Started MySQL Community Server.

root@mysqlhost2:~#
Como se puede ver, si todo ha ido bien, ya tenemos MySQL funcionando:
root@mysqlhost2:~# mysql -u root
Welcome to the MySQL monitor.  Commands end with ; or \g.
Your MySQL connection id is 8
Server version: 8.0.20 MySQL Community Server - GPL

Copyright (c) 2000, 2020, Oracle and/or its affiliates. All rights reserved.

Oracle is a registered trademark of Oracle Corporation and/or its
affiliates. Other names may be trademarks of their respective
owners.

Type 'help;' or '\h' for help. Type '\c' to clear the current input statement.
mysql>
Configuración inicial de MySQL
Desde fuera no podemos conectarnos ya que tenemos que configurar usuarios, hosts permitidos, etc:
root@ger:~# mysql -h 172.17.0.2
ERROR 1130 (HY000): Host '_gateway' is not allowed to connect to this MySQL server
root@ger:~#
Esto veremos cómo hacerlo más adelante, ya que es común con MariaDB, el problema real que hemos visto al instalar MySQL es que por defecto deja el acceso local sin pedir password (al menos en CentOS).
Para configurar esta parte según instalemos y levantemos el servicio de MySQL, debemos ejecutar el comando “mysql_secure_installation” como veremos a continuación:
[root@mysqlhost ~]# mysql_secure_installation

Securing the MySQL server deployment.

Connecting to MySQL using a blank password.

VALIDATE PASSWORD COMPONENT can be used to test passwords
and improve security. It checks the strength of password
and allows the users to set only those passwords which are
secure enough. Would you like to setup VALIDATE PASSWORD component?

Press y|Y for Yes, any other key for No: y

There are three levels of password validation policy:

LOW    Length >= 8
MEDIUM Length >= 8, numeric, mixed case, and special characters
STRONG Length >= 8, numeric, mixed case, special characters and dictionary                  file

Please enter 0 = LOW, 1 = MEDIUM and 2 = STRONG: 2
Please set the password for root here.

New password:

Re-enter new password:

Estimated strength of the password: 100
Do you wish to continue with the password provided?(Press y|Y for Yes, any other key for No) : y
By default, a MySQL installation has an anonymous user,
allowing anyone to log into MySQL without having to have
a user account created for them. This is intended only for
testing, and to make the installation go a bit smoother.
You should remove them before moving into a production
environment.

Remove anonymous users? (Press y|Y for Yes, any other key for No) : y
Success.


Normally, root should only be allowed to connect from
'localhost'. This ensures that someone cannot guess at
the root password from the network.

Disallow root login remotely? (Press y|Y for Yes, any other key for No) : y
Success.

By default, MySQL comes with a database named 'test' that
anyone can access. This is also intended only for testing,
and should be removed before moving into a production
environment.


Remove test database and access to it? (Press y|Y for Yes, any other key for No) : y
 - Dropping test database...
Success.

 - Removing privileges on test database...
Success.

Reloading the privilege tables will ensure that all changes
made so far will take effect immediately.

Reload privilege tables now? (Press y|Y for Yes, any other key for No) : y
Success.

All done!
[root@mysqlhost ~]#
Ahora ya pedirá la password:
[root@mysqlhost ~]# mysql
ERROR 1045 (28000): Access denied for user 'root'@'localhost' (using password: NO)
[root@mysqlhost ~]# mysql -u root
ERROR 1045 (28000): Access denied for user 'root'@'localhost' (using password: NO)
[root@mysqlhost ~]# mysql -u root -p
Enter password:
Welcome to the MySQL monitor.  Commands end with ; or \g.
Your MySQL connection id is 17
Server version: 8.0.17 Source distribution

Copyright (c) 2000, 2019, Oracle and/or its affiliates. All rights reserved.
Oracle is a registered trademark of Oracle Corporation and/or its
affiliates. Other names may be trademarks of their respective
owners.

Type 'help;' or '\h' for help. Type '\c' to clear the current input statement.
mysql>
 Administrar MySQL y MariaDB